- 博客/
OpenVpn 的安装,并配置关联 openLdap 认证
作者
Johny
熟练的 云原生搬砖师
Table of Contents
环境说明#
docker-compose:1.23.2- 操作系统:
armbian (斐讯n1)
部署软件#
openldap 部署#
省略 openldap 的部署配置 请参考之前整理的
文档
openvpn 安装#
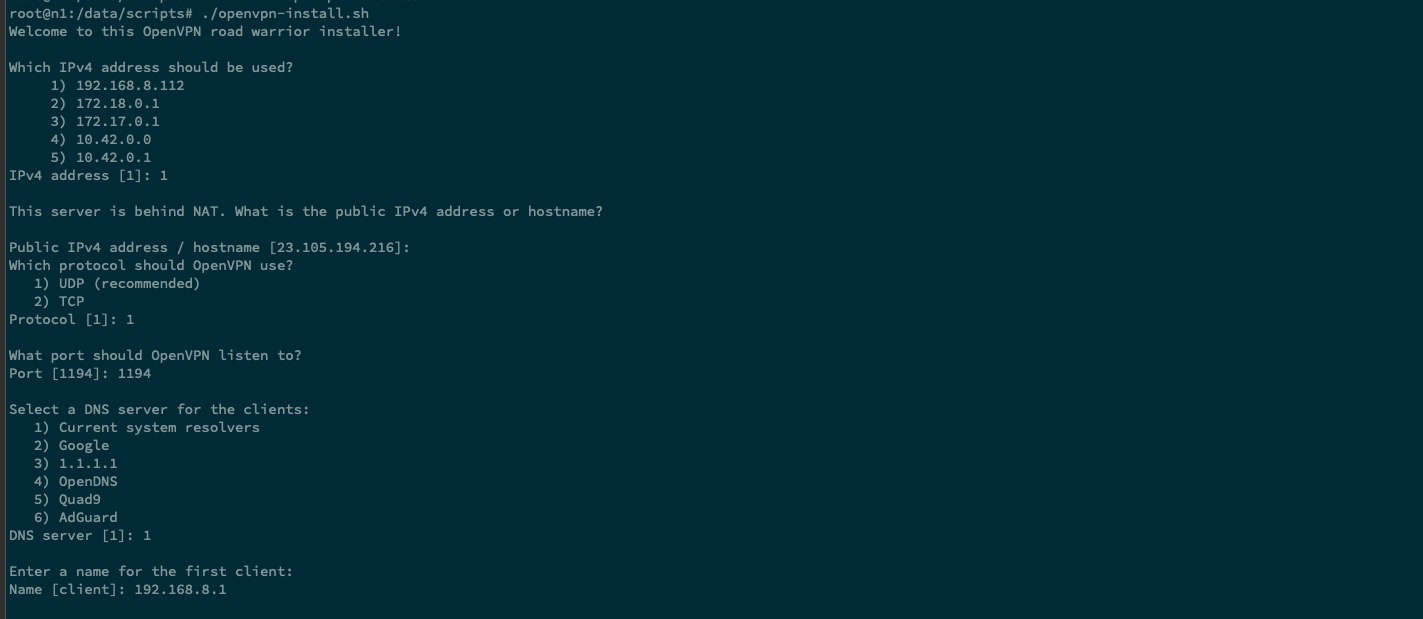
这里 openvpn 一键安装使用 github 中的一键脚本
curl -o openvpn-install.sh  https://raw.githubusercontent.com/Nyr/openvpn-install/master/openvpn-install.sh


chmod a+x openvpn-install.sh

./openvpn-install.sh

Welcome to this OpenVPN road warrior installer!

Which IPv4 address should be used?
     1) 192.168.8.112
     2) 172.18.0.1
     3) 172.17.0.1
     4) 10.42.0.0
     5) 10.42.0.1
IPv4 address [1]: 1

This server is behind NAT. What is the public IPv4 address or hostname?

Public IPv4 address / hostname [23.105.194.216]:
Which protocol should OpenVPN use?
   1) UDP (recommended)
   2) TCP
Protocol [1]: 1

What port should OpenVPN listen to?
Port [1194]: 1194

Select a DNS server for the clients:
   1) Current system resolvers
   2) Google
   3) 1.1.1.1
   4) OpenDNS
   5) Quad9
   6) AdGuard
DNS server [1]: 1

Enter a name for the first client:
Name [client]: 192.168.8.1

OpenVPN installation is ready to begin.
等待程序的执行完毕 设置程序为开启自启动
systemctl enable openvpn-server@server.service
开放端口
如开启和使用了防火墙,请注意将 对应端口开放
iptables -A INPUT -p udp --sport 1194 -j ACCEPT
iptables -A OUTPUT -p udp --dport 1194 -j ACCEPT
配置关联openldap#
安装依赖包#
apt install openvpn-auth-ldap # 如果是 centos 将前面命令更改为 yum 即可
安装完毕后,查看使用有如下
依赖库文件ls -lh /usr/lib/openvpn/openvpn-auth-ldap.so -rw-r--r-- 1 root root 126K Nov 7 2017 /usr/lib/openvpn/openvpn-auth-ldap.socentos 下的文件路径为
/usr/lib64/openvpn/plugin/lib/openvpn-auth-ldap.so
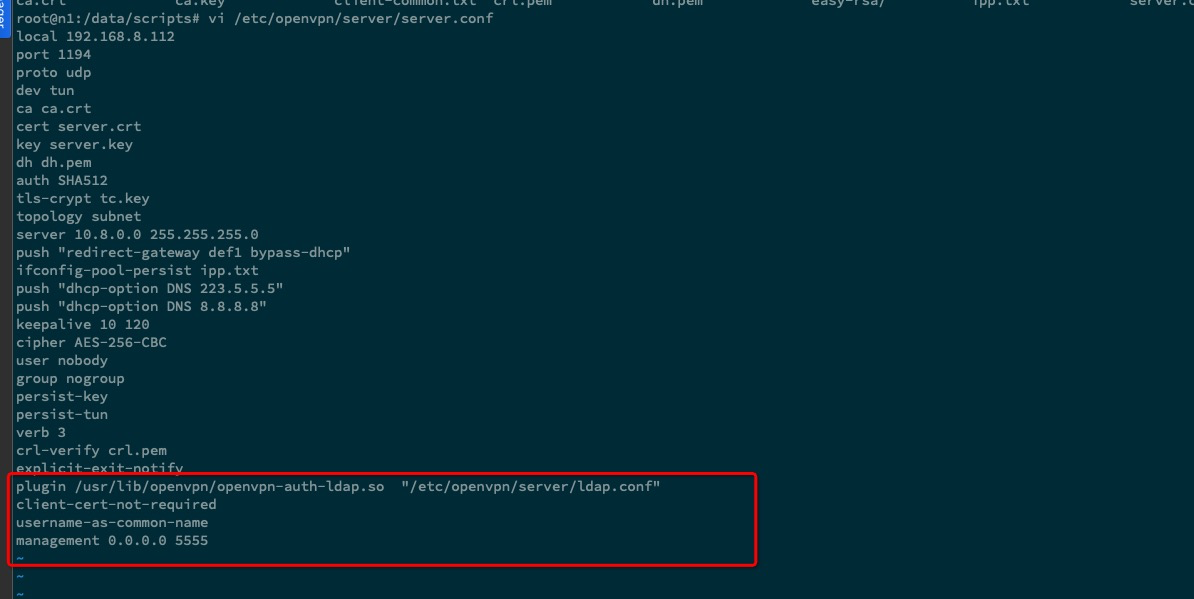
配置文件增加配置#
vi /etc/openvpn/server/server.conf  # 在最后添加如下配置

plugin /usr/lib/openvpn/openvpn-auth-ldap.so  "/etc/openvpn/server/ldap.conf"
client-cert-not-required
username-as-common-name
management 0.0.0.0 5555
增加 openldap配置文件
cat > /etc/openvpn/server/ldap.conf << EOF `# 注意修改下面对应的配置`
<LDAP>
    URL ldap://192.168.8.1:389
    BindDN  cn=admin,dc=treesir,dc=pub
    Password 123456
    Timeout 15
    TLSEnable no
    FollowReferrals no
</LDAP>
<Authorization>
    BaseDN "ou=users,dc=treesir,dc=pub"
    SearchFilter "(uid=%u)"
    RequireGroup false
</Authorization>
EOF
示例中 ldap 目录使用结构 参考文档
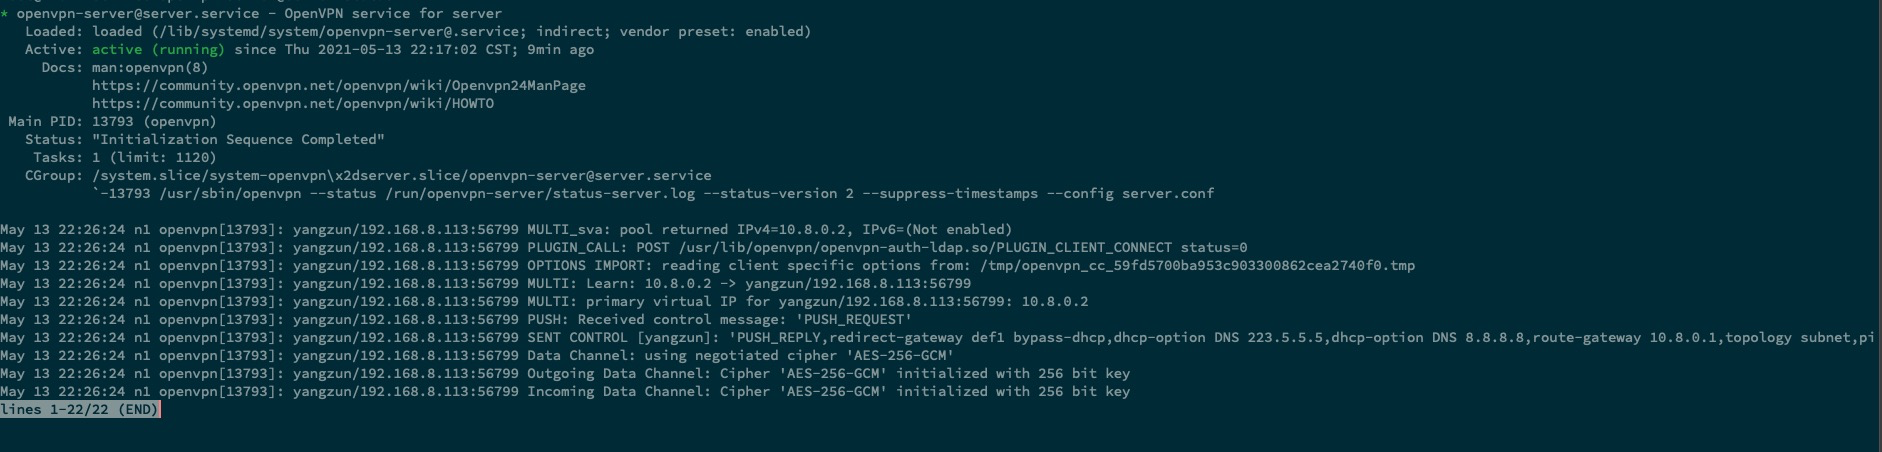
更改完成后,我们重启服务使其生效
service openvpn-server@server restart \
&& service openvpn-server@server status
测试验证#
配置 nps 内网穿透的使用
将配置文件里的
remote地址更改为公网地址,没有公网地址的话,可以使用第三方内网穿透工具实现, 下面示例将使用自建的nps作为演示

注意这个映射地址外面设置成了
21174那么在对应的配置文件中也要相应更改成这个,还有就是协议需要 和安装时选择的对应上,我这里使用的是udp协议。
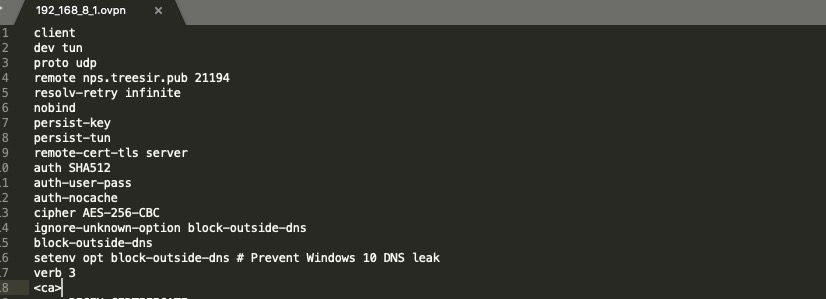
下载安装 vpn 时的客户端配置文件
sz -y /root/192_168_8_1.ovpn ## 默认在 用户的家目录中
编辑下载的配置文件
remote nps.treesir.pub 21194 # 将此地址更改为 公网地址,没有公网地址的话,可以使用第三方内网穿透工具实现

auth-user-pass # 添加用户密码认证
auth-nocache # 认证不缓存
setenv opt block-outside-dns # Prevent Windows 10 DNS leak

手机端测试
将配置文件上传至手机端进行测试

可以看到手机端使用流量,测试也是正常可以访问到内网的。
部署 openldap dashboard#
docker run --name openvpn-monitor \
  -e OPENVPNMONITOR_DEFAULT_DATETIMEFORMAT="%%d/%%m/%%Y" \
  -e OPENVPNMONITOR_DEFAULT_LATITUDE=-37 \
  -e OPENVPNMONITOR_DEFAULT_LOGO=logo.jpg \
  -e OPENVPNMONITOR_DEFAULT_LONGITUDE=144 \
  -e OPENVPNMONITOR_DEFAULT_MAPS=True \
  -e OPENVPNMONITOR_DEFAULT_SITE=Test \
  -e OPENVPNMONITOR_SITES_0_ALIAS=UDP \
  -e OPENVPNMONITOR_SITES_0_HOST=192.168.8.112 \
  -e OPENVPNMONITOR_SITES_0_NAME=UDP \
  -e OPENVPNMONITOR_SITES_0_PORT=5555 \
  -e OPENVPNMONITOR_SITES_1_ALIAS=TCP \
  -e OPENVPNMONITOR_SITES_1_HOST=192.168.8.112 \
  -e OPENVPNMONITOR_SITES_1_NAME=TCP \
  -e OPENVPNMONITOR_SITES_1_PORT=5555 \
  --restart=always \
  -p 8210:80 \
  -d ruimarinho/openvpn-monitor
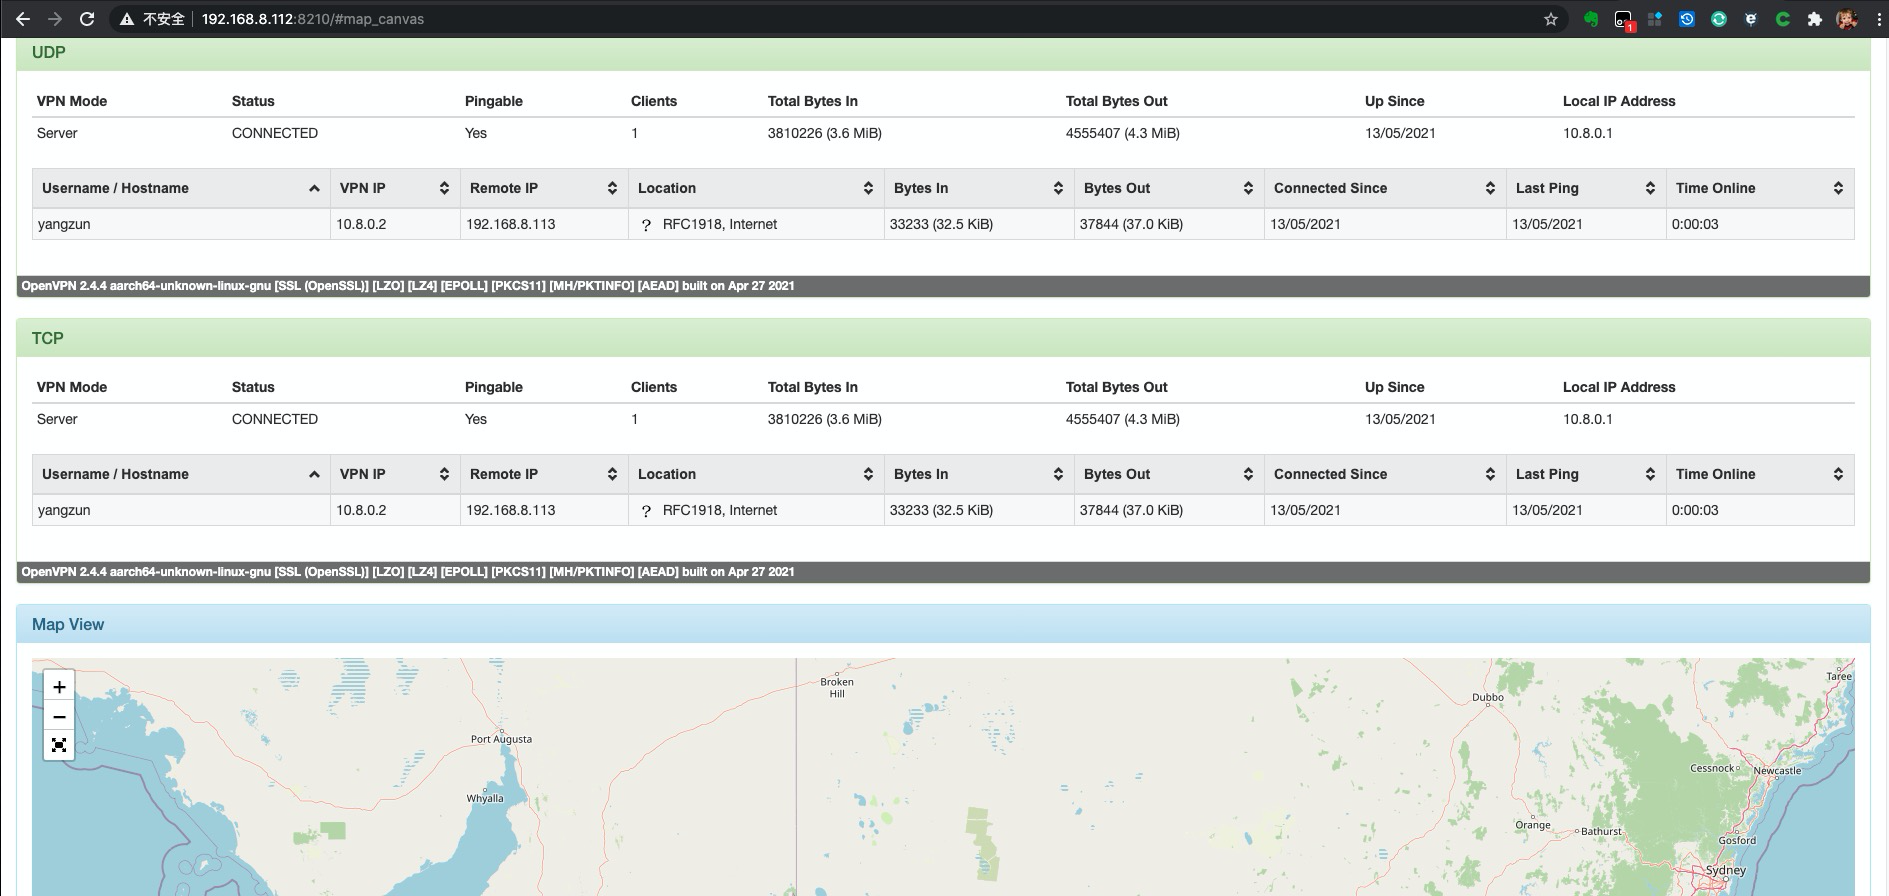
可以看到,dashboard 中的
remote ip是 192.168.8.113,且map中无对应显示地址 ( map 更具 remote ip 显示 ), 这是因为我使用了内网穿透技术的缘故,企业中建议是绑定到对应的公网ip中,并使用DNAT作为端口映射,这样dashboard 中的 map 显示将呈现正常。
客户端软件下载#
openvpn-install-2.4.8-I602-Win10
相关文章
Centos7 执行 shutdown 无法正常关机的解决
·468 字·1 分钟·
linux
centos7
shell
Centos 7 Yum 安装 Jenkins 及常用配置的说明
·1419 字·3 分钟·
devops
jenkins
ci-cd
install
Jira & confluence 安装 并 配置 破解激活
·1146 字·3 分钟·
devops
jira
install
confluence
Raid 阵列卡 Megacli 管理工具的使用记录
·211 字·1 分钟·
linux
raid
stroage
使用 Docker 部署 Nexus3 私服的详细记录总结
·2798 字·6 分钟·
docker
devops
nexus3
install
Kubeadm 部署 kubernetes-v1.19.x 集群
·2153 字·5 分钟·
k8s
kubeadm
v1.19.x
install