- 博客/
使用 Kubekey 一键 离线/在线 部署 kubernetes 集群
作者
Johny
熟练的 云原生搬砖师
Table of Contents
环境说明#
概述#
KubeSphere 是在 Kubernetes 之上构建的面向云原生应用的分布式操作系统,完全开源,支持多云与多集群管理,提供全栈的 IT 自动化运维能力,简化企业的 DevOps 工作流。它的架构可以非常方便地使第三方应用与云原生生态组件进行即插即用 (plug-and-play) 的集成。
KubeKey(由 Go 语言开发且
代码开源)是一种全新的安装工具,替代了以前使用的基于 ansible 的安装程序。KubeKey 提供灵活的安装选择,可以仅安装Kubernetes,也可以同时安装 Kubernetes 和 KubeSphere。使用场景:
- 仅安装 Kubernetes;
- 使用一个命令同时安装 Kubernetes 和 KubeSphere;
- 扩缩集群;
- 升级集群;
- 安装 Kubernetes 相关的插件(Chart 或 YAML)。
环境说明#
- 操作系统:
CentOS Linux release 7.8.2003 (Core) - 服务器
cpu架构:x86_64
online 模式部署#
此次演示,准备两台只安装了操作系统和配置了ip地址的主机。
node1: 192.168.8.30node2: 192.168.8.31
下载源码 编译 kubekey#
yum install -y git

git clone https://github.com/kubesphere/kubekey.git \
&& cd kubekey

./build.sh -p  # 执行编译

ls  -lh output/kk # 编译结束后,会在 output 目录下,生成可执行程序 kk
-rwxr-xr-x 1 root root 57M 4月  26 15:17 output/kk

output/kk version
version.BuildInfo{Version:"latest+unreleased", GitCommit:"22d2e7648569a7e538cbbd6505ce9aca4180d6a1", GitTreeState:"clean", GoVersion:"go1.14.7"}
创建配置文件#
scp output/kk 192.168.8.30:/usr/local/bin/ # copy 编译好的命令至 node1

[root@localhost ~]# kk version  # node1
version.BuildInfo{Version:"latest+unreleased", GitCommit:"22d2e7648569a7e538cbbd6505ce9aca4180d6a1", GitTreeState:"clean", GoVersion:"go1.14.7"}

./kk create config --with-kubernetes v1.17.9  # 创建 v1.17.9 版本的配置文件,版本列表请查看此链接https://github.com/kubesphere/kubekey/blob/master/docs/kubernetes-versions.md
启动集群#
cat config-sample.yaml # 配置文件展示
apiVersion: kubekey.kubesphere.io/v1alpha1
kind: Cluster
metadata:
name: sample
spec:
hosts:
- {name: node1, address: 192.168.8.30, internalAddress: 192.168.8.30, user: root, password: 123456} # 将对应主机的密码填入
- {name: node2, address: 192.168.8.31, internalAddress: 192.168.8.31, user: root, password: 123456}
roleGroups: # 配置机器角色
etcd:
- node1
master:
- node1
worker:
- node1
- node2
controlPlaneEndpoint:
domain: lb.kubesphere.local
address: ""
port: 6443
kubernetes:
version: v1.17.9
imageRepo: kubesphere
clusterName: cluster.local
network:
plugin: calico
kubePodsCIDR: 10.233.64.0/18
kubeServiceCIDR: 10.233.0.0/18
registry:
registryMirrors: []
insecureRegistries: []
addons: []
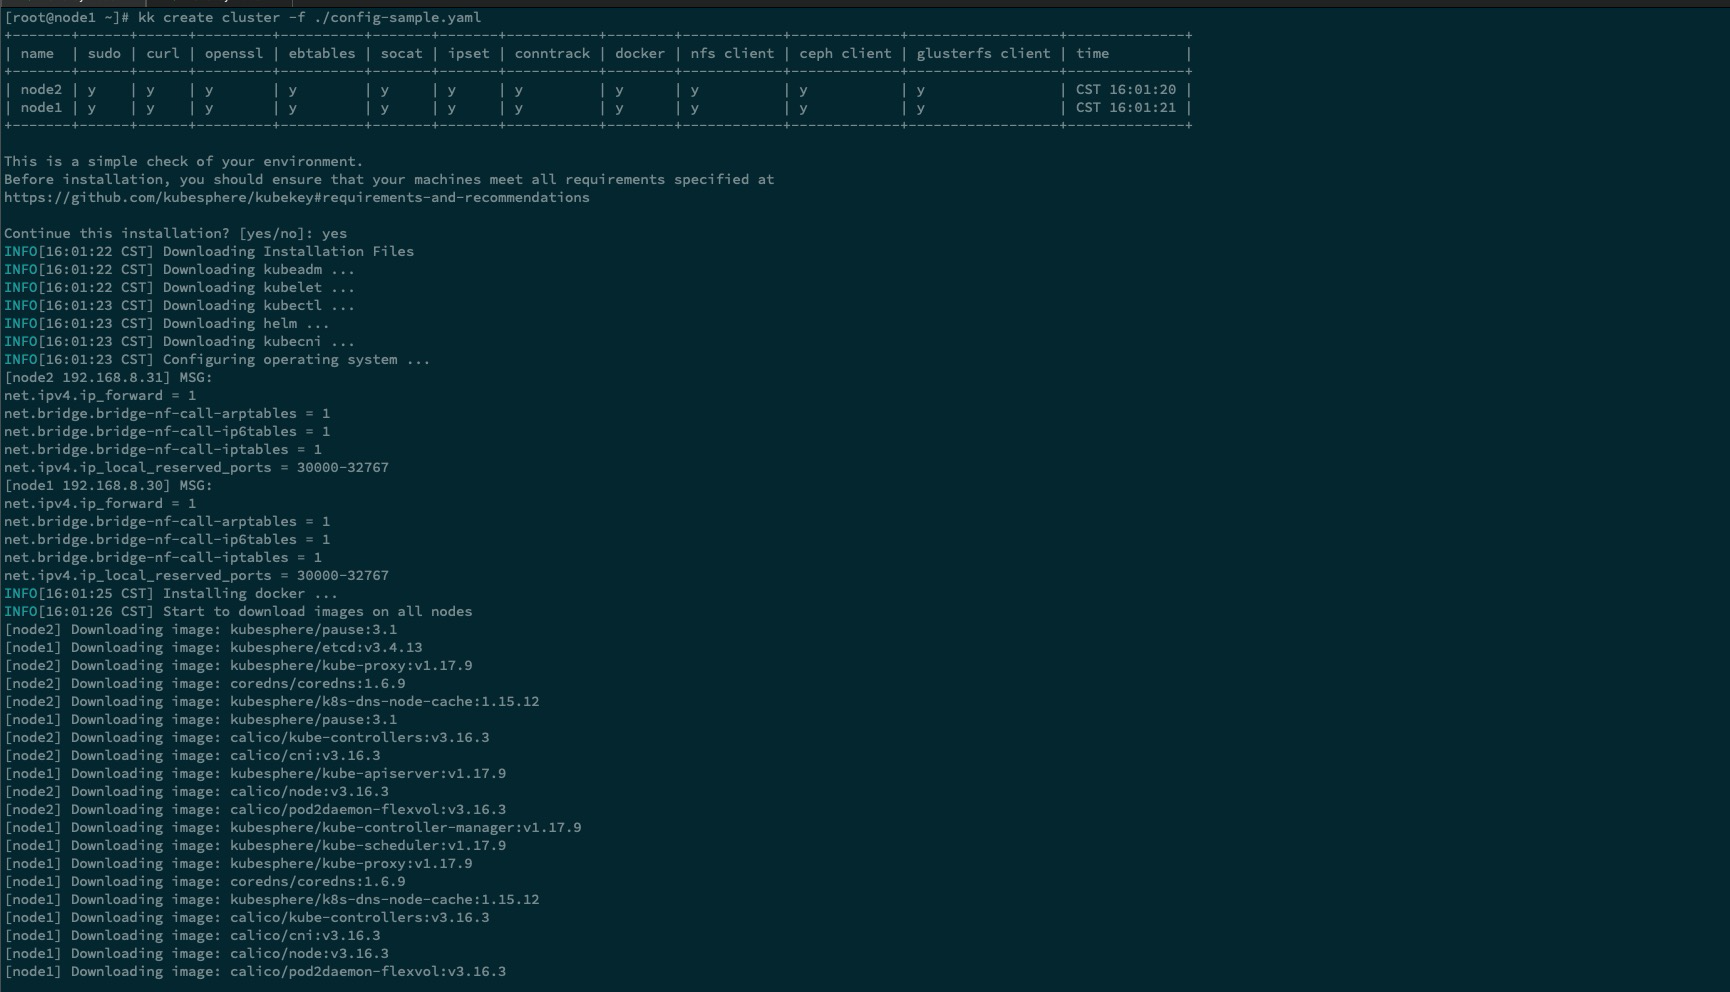
kk init os -f ./config-sample.yaml # 初始化集群机器,此操作会安装系统依赖,开启lpvs模块等。前提是确保对应node的网络通畅。
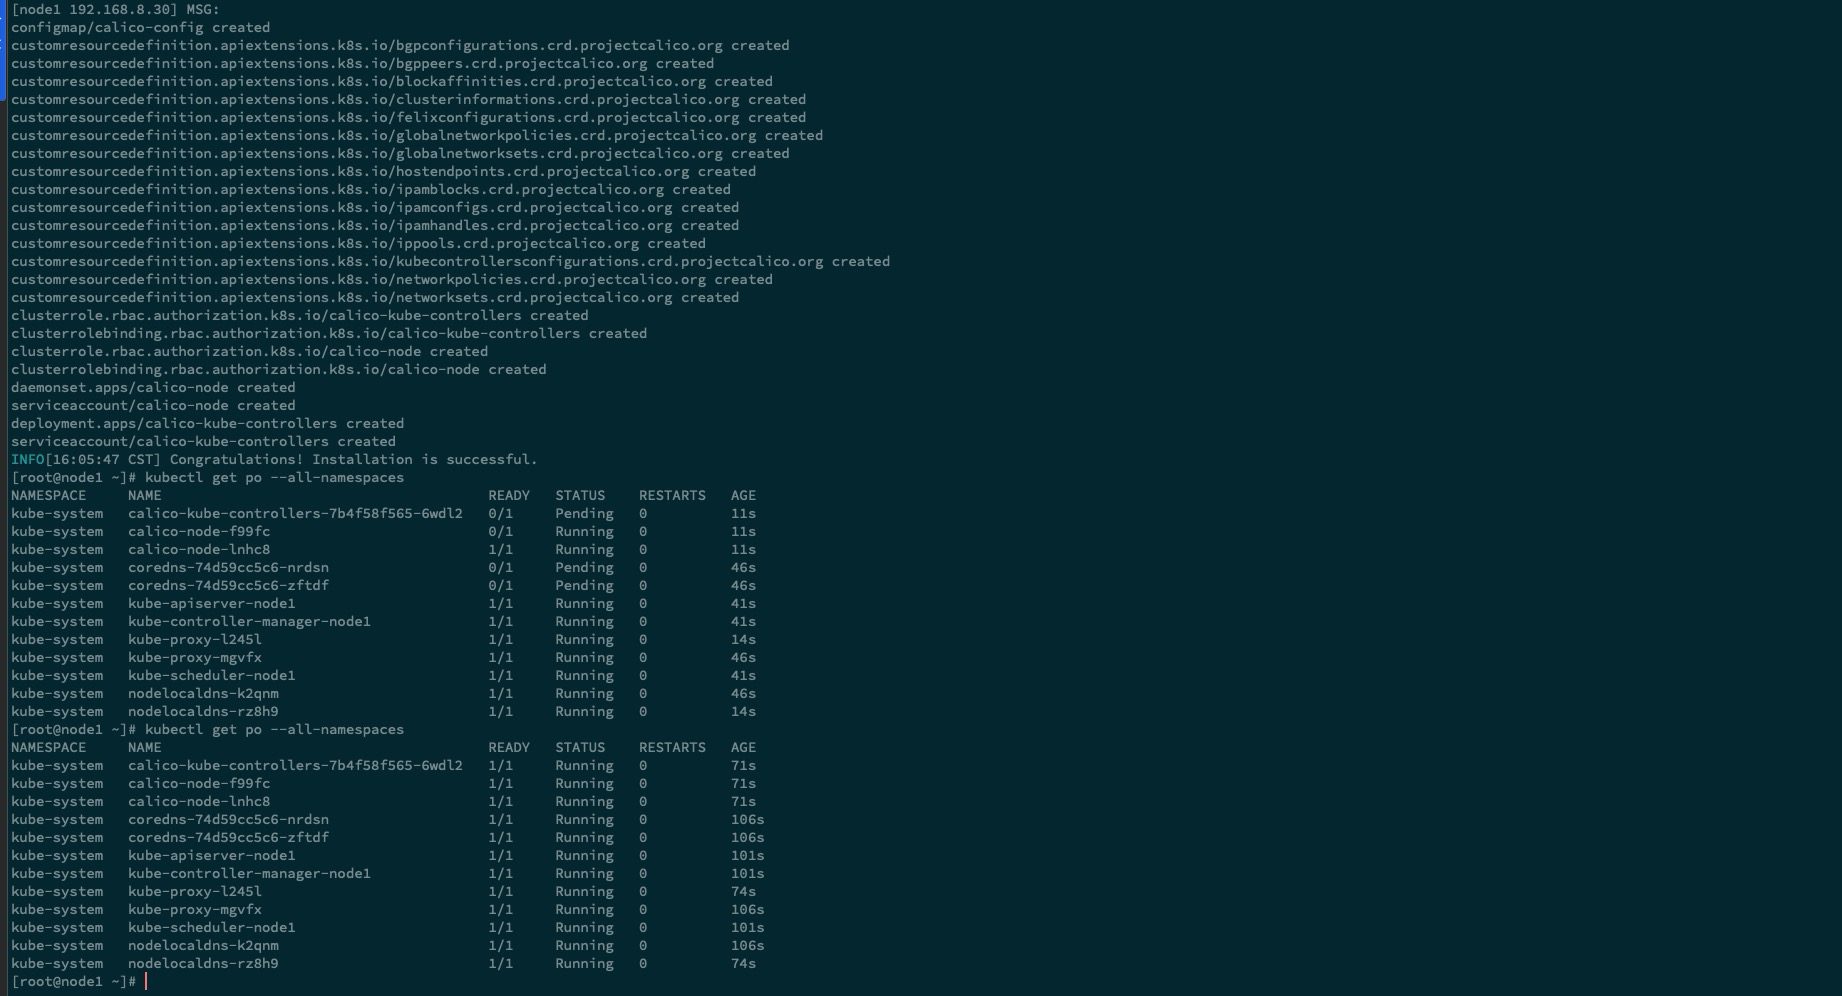
kk create cluster -f ./config-sample.yaml # 创建集群
kubectl get po --all-namespaces # 等待 30s 左右就会初始化完成
NAMESPACE NAME READY STATUS RESTARTS AGE
kube-system calico-kube-controllers-7b4f58f565-6wdl2 0/1 Pending 0 11s
kube-system calico-node-f99fc 0/1 Running 0 11s
kube-system calico-node-lnhc8 1/1 Running 0 11s
kube-system coredns-74d59cc5c6-nrdsn 0/1 Pending 0 46s
kube-system coredns-74d59cc5c6-zftdf 0/1 Pending 0 46s
kube-system kube-apiserver-node1 1/1 Running 0 41s
kube-system kube-controller-manager-node1 1/1 Running 0 41s
kube-system kube-proxy-l245l 1/1 Running 0 14s
kube-system kube-proxy-mgvfx 1/1 Running 0 46s
kube-system kube-scheduler-node1 1/1 Running 0 41s
kube-system nodelocaldns-k2qnm 1/1 Running 0 46s
kube-system nodelocaldns-rz8h9 1/1 Running 0 14s
offline 部署#
上述文档中,离线部署已
非常详细,下面演示步骤中,且着重展示去掉无用操作的优化项。文档中
kubesphere-all-v3.0.0-offline-linux-amd64.tar.gz文件下载,那个下载太慢了 (限速)
- 百度云盘链接 : (bfvp)。
部署前准备#
环境与
online部署环境基本一致,只是网络是无法访问外网的。
- 取消机器默认路由,使其无法访问外网
ip route add default via 192.168.8.253 # 将默认路由指向一个不存在的网关

ping -c3  223.5.5.5
PING 223.5.5.5 (223.5.5.5) 56(84) bytes of data.
From 192.168.8.31 icmp_seq=1 Destination Host Unreachable
From 192.168.8.31 icmp_seq=2 Destination Host Unreachable
From 192.168.8.31 icmp_seq=3 Destination Host Unreachable
解压文件#
tar xf kubesphere-all-v3.0.0-offline-linux-amd64.tar.gz
创建集群配置文件#
./kk create config --with-kubernetes v1.17.9
修改默认生成的配置文件展示#
apiVersion: kubekey.kubesphere.io/v1alpha1
kind: Cluster
metadata:
  name: sample
spec:
  hosts:
  - {name: node1, address: 192.168.8.30, internalAddress: 192.168.8.30, user: root, password: 123456}
  - {name: node2, address: 192.168.8.31, internalAddress: 192.168.8.31, user: root, password: 123456}
  roleGroups:
    etcd:
    - node1
    master:
    - node1
    worker:
    - node1
    - node2
  controlPlaneEndpoint:
    domain: lb.kubesphere.local
    address: ""
    port: "6443"
  kubernetes:
    version: v1.17.9
    imageRepo: kubesphere
    clusterName: cluster.local
  network:
    plugin: calico
    kubePodsCIDR: 10.233.64.0/18
    kubeServiceCIDR: 10.233.0.0/18
  registry:
    registryMirrors: []
    insecureRegistries: []
    privateRegistry: dockerhub.kubekey.local  # 添加使用 kubekey 创建的私服
  addons: []
节点环境初始化#
./kk init os -f config-sample.yaml -s ./dependencies/

docker load < kubesphere-images-v3.0.0/registry.tar  # 加载私服镜像

./kk init os -f config-sample.yaml -s ./dependencies/ --add-images-repo # 启动镜像私服

docker ps # 可以看到私服已经启动了
CONTAINER ID        IMAGE               COMMAND                  CREATED             STATUS              PORTS                            NAMES
741cbeff3dee        registry:2          "/entrypoint.sh /etc…"   19 seconds ago      Up 17 seconds       0.0.0.0:443->443/tcp, 5000/tcp   kubekey-registry

上传镜像至私服中#
此步骤比较漫长,可以更具实际使用情况,进行删除
images-list-v3.0.0.txt中的镜像列表 和 路径下的*.tar结尾的镜像压缩包
cd kubesphere-images-v3.0.0 \
&&./push-images.sh  dockerhub.kubekey.local  # 加载路径下的所有 *.tar 结尾的镜像压缩包,并根据 images-list-v3.0.0.txt 中的镜像列表,进行上传至刚才创建的私服中。
启动集群#
./kk create cluster -f config-sample.yaml

kubectl get po --all-namespaces
NAMESPACE     NAME                                       READY   STATUS    RESTARTS   AGE
kube-system   calico-kube-controllers-677cbc8557-c9n9b   1/1     Running   0          48s
kube-system   calico-node-bhjwf                          1/1     Running   0          48s
kube-system   calico-node-f278s                          1/1     Running   0          24s
kube-system   coredns-79878cb9c9-g5drn                   1/1     Running   0          63s
kube-system   coredns-79878cb9c9-lsh7n                   1/1     Running   0          63s
kube-system   kube-apiserver-node1                       1/1     Running   0          58s
kube-system   kube-controller-manager-node1              1/1     Running   0          58s
kube-system   kube-proxy-5zkpg                           1/1     Running   0          63s
kube-system   kube-proxy-c986s                           1/1     Running   0          24s
kube-system   kube-scheduler-node1                       1/1     Running   0          58s
kube-system   nodelocaldns-p5fkv                         1/1     Running   0          63s
kube-system   nodelocaldns-phh4s                         1/1     Running   0          24s
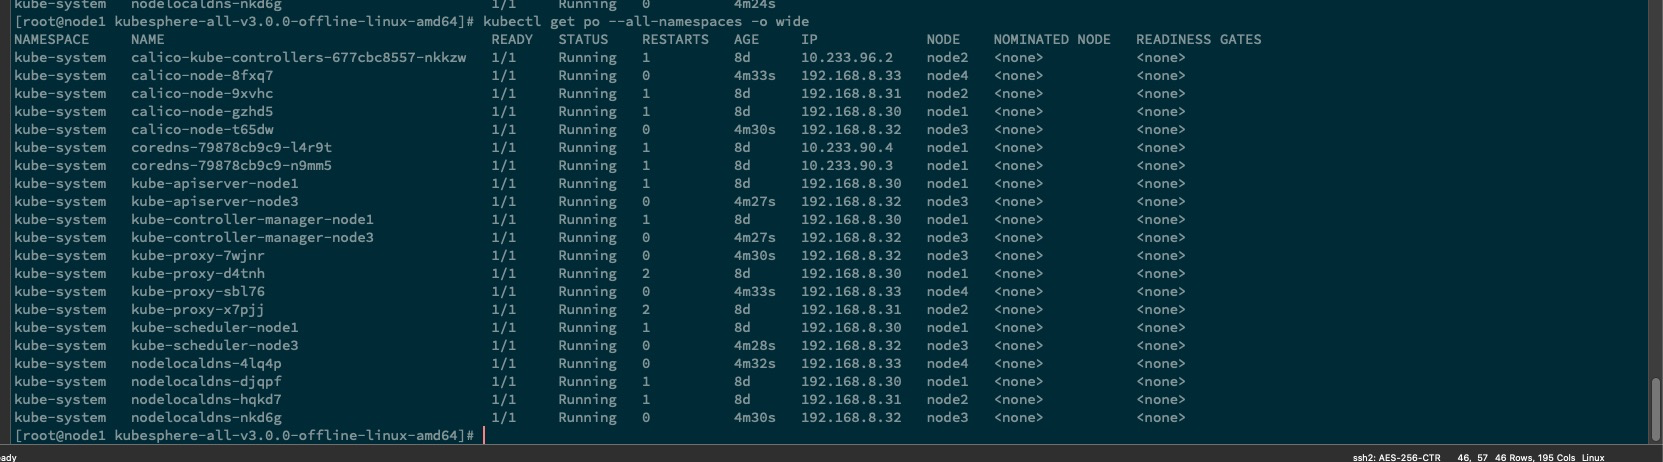
扩展集群角色的配置#
示例将,对上面部署的集群进行扩展,分别扩展
master&worker各一台,扩展中 master apiserver 负载均衡器将使用nginx承担
本次新增节点列表如下所示
| 主机名称 | 集群角色 | IP地址 |
|---|---|---|
| node3 | master | 192.168.8.32 |
| node4 | worker | 192.168.8.33 |
| manage | lb (nginx) | 192.168.8.88 |
nginx 负载均衡配置#
安装
yum install -y wget

mv /etc/yum.repos.d{,.bak} \
&& mkdir -p /etc/yum.repos.d \
&& curl -o /etc/yum.repos.d/CentOS-Base.repo https://mirrors.aliyun.com/repo/Centos-7.repo \
&& wget -O /etc/yum.repos.d/epel.repo http://mirrors.aliyun.com/repo/epel-7.repo \
&& yum clean all \
&& yum makecache fast


yum install -y nginx*
负载均衡配置
cat nginx.conf

user nginx nginx;
worker_processes auto;

error_log /data/wwwlogs/error_nginx.log crit;
pid /var/run/nginx.pid;
worker_rlimit_nofile 51200;
load_module "/usr/lib64/nginx/modules/ngx_stream_module.so";

events {
  use epoll;
  worker_connections 51200;
  multi_accept on;
}

http {
  include mime.types;
  default_type application/octet-stream;
  server_names_hash_bucket_size 128;
  client_header_buffer_size 32k;
  large_client_header_buffers 4 32k;
  client_max_body_size 1024m;
  client_body_buffer_size 10m;
  sendfile on;
  tcp_nopush on;
  keepalive_timeout 120;
  server_tokens off;
  tcp_nodelay on;

  fastcgi_connect_timeout 300;
  fastcgi_send_timeout 300;
  fastcgi_read_timeout 300;
  fastcgi_buffer_size 64k;
  fastcgi_buffers 4 64k;
  fastcgi_busy_buffers_size 128k;
  fastcgi_temp_file_write_size 128k;
  fastcgi_intercept_errors on;

  #Gzip Compression
  gzip on;
  gzip_buffers 16 8k;
  gzip_comp_level 6;
  gzip_http_version 1.1;
  gzip_min_length 256;
  gzip_proxied any;
  gzip_vary on;
  gzip_types
    text/xml application/xml application/atom+xml application/rss+xml application/xhtml+xml image/svg+xml
    text/javascript application/javascript application/x-javascript
    text/x-json application/json application/x-web-app-manifest+json
    text/css text/plain text/x-component
    font/opentype application/x-font-ttf application/vnd.ms-fontobject
    image/x-icon;
  gzip_disable "MSIE [1-6]\.(?!.*SV1)";

  ##Brotli Compression
  #brotli on;
  #brotli_comp_level 6;
  #brotli_types text/plain text/css application/json application/x-javascript text/xml application/xml application/xml+rss text/javascript application/javascript image/svg+xml;

  ##If you have a lot of static files to serve through Nginx then caching of the files' metadata (not the actual files' contents) can save some latency.
  #open_file_cache max=1000 inactive=20s;
  #open_file_cache_valid 30s;
  #open_file_cache_min_uses 2;
  #open_file_cache_errors on;

######################## default ############################
  include vhost/*.conf;
}

stream {
    upstream kubekey_apiserver {
        least_conn;
        server 192.168.8.30:6443 max_fails=3 fail_timeout=5s;
        server 192.168.8.32:6443 max_fails=3 fail_timeout=5s;
    }
    server {
        listen     6443;
        proxy_pass kubekey_apiserver;
    }
}


mkdir -p /data/wwwlogs/ \
&& chmod 777 -R /data/wwwlogs/ # 创建日志目录


nginx -t # 检查配置文件
nginx: the configuration file /etc/nginx/nginx.conf syntax is ok
nginx: configuration file /etc/nginx/nginx.conf test is successful

sed -i 's#SELINUX=enforcing#SELINUX=disabled#g' /etc/selinux/config  # 关闭 selinux,防止启动报错
grep -i  ^selinux= /etc/selinux/config
setenforce 0
getenforce

service firewalld stop \
&& systemctl disable firewalld # 关闭防火墙

service nginx start \
&& systemctl enable nginx  # 启动 nginx 并设置开机自启


ss -lntp|grep ":6443"  # 检查端口
LISTEN     0      128          *:6443                     *:*                   users:(("nginx",pid=8513,fd=5),("nginx",pid=8512,fd=5),("nginx",pid=8511,fd=5),("nginx",pid=8510,fd=5),("nginx",pid=8509,fd=5),("nginx",pid=8508,fd=5),("nginx",pid=8507,fd=5),("nginx",pid=8506,fd=5),("nginx",pid=8495,fd=5))
更改kubekey 配置文件#
修改后的配置文件展示
cat config-sample.yaml

apiVersion: kubekey.kubesphere.io/v1alpha1
kind: Cluster
metadata:
  name: sample
spec:
  hosts:
  - {name: node1, address: 192.168.8.30, internalAddress: 192.168.8.30, user: root, password: 123456}
  - {name: node2, address: 192.168.8.31, internalAddress: 192.168.8.31, user: root, password: 123456}
  - {name: node3, address: 192.168.8.32, internalAddress: 192.168.8.32, user: root, password: 123456}
  - {name: node4, address: 192.168.8.33, internalAddress: 192.168.8.33, user: root, password: 123456}
  roleGroups:
    etcd:  # 这里的 etcd 的节点数需要是奇数,所以也将 node2 也加入至 etcd集群中。
    - node1
    - node2
    - node3
    master:
    - node1
    - node3
    worker:
    - node1
    - node2
    - node3
    - node4
  controlPlaneEndpoint:
    domain: lb.kubesphere.local
    address: "192.168.8.88"
    port: "6443"
  kubernetes:
    version: v1.17.9
    imageRepo: kubesphere
    clusterName: cluster.local
  network:
    plugin: calico
    kubePodsCIDR: 10.233.64.0/18
    kubeServiceCIDR: 10.233.0.0/18
  registry:
    registryMirrors: []
    insecureRegistries: []
    privateRegistry: dockerhub.kubekey.local  # 添加使用 kubekey 创建的私服
  addons: []
执行添加节点#
初始化新添加的节点#
./kk init os -f config-sample.yaml -s ./dependencies/ --add-images-repo # 示例适用上面离线安装的步骤,如 online部署,取消 -s 选项

执行节点添加#
service firewalld stop \
&& systemctl disable firewalld # 关闭防火墙,防止加入节点时端口不同
sed -i 's#SELINUX=enforcing#SELINUX=disabled#g' /etc/selinux/config # 关闭 selinux,防止启动报错
grep -i ^selinux= /etc/selinux/config
setenforce 0
getenforce
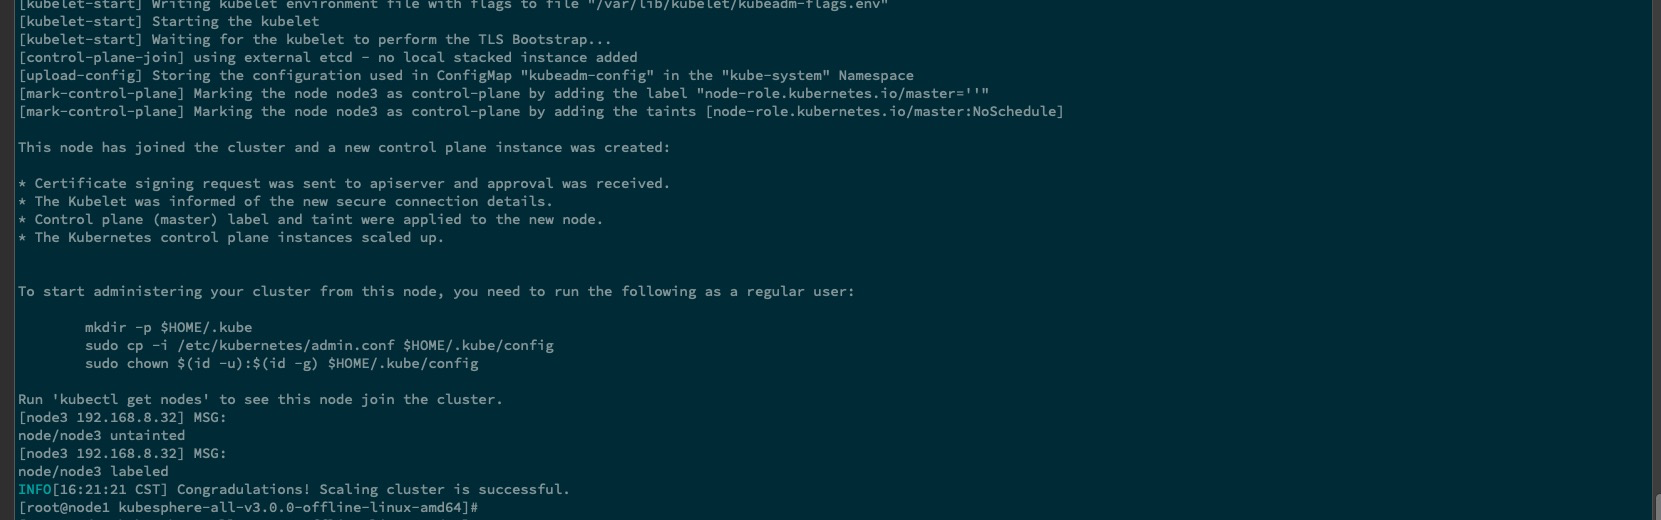
./kk add nodes -f ./config-sample.yaml
kubectl get nodes -o wide
NAME STATUS ROLES AGE VERSION INTERNAL-IP EXTERNAL-IP OS-IMAGE KERNEL-VERSION CONTAINER-RUNTIME
node1 Ready master,worker 8d v1.17.9 192.168.8.30 <none> CentOS Linux 7 (Core) 3.10.0-1127.el7.x86_64 docker://19.3.13
node2 Ready worker 8d v1.17.9 192.168.8.31 <none> CentOS Linux 7 (Core) 3.10.0-1127.el7.x86_64 docker://19.3.13
node3 Ready master,worker 2m23s v1.17.9 192.168.8.32 <none> CentOS Linux 7 (Core) 3.10.0-1127.el7.x86_64 docker://19.3.13
node4 Ready worker 2m26s v1.17.9 192.168.8.33 <none> CentOS Linux 7 (Core) 3.10.0-1127.el7.x86_64 docker://19.3.13
在上面示例中,执行的前两步,可以在 github 中找到对应 kubekey仓库,clone 最新源码,在源码中做对应添加后,再执行编译,这样我们就不需要每台多去执行了。

更具体操作请参考下述文档#
相关文章
Kubeadm 部署 kubernetes-v1.19.x 集群
·2153 字·5 分钟·
k8s
kubeadm
v1.19.x
install
OpenVpn 的安装,并配置关联 openLdap 认证
·953 字·2 分钟·
linux
network
openvpn
install
Centos 7 Yum 安装 Jenkins 及常用配置的说明
·1419 字·3 分钟·
devops
jenkins
ci-cd
install
Jira & confluence 安装 并 配置 破解激活
·1146 字·3 分钟·
devops
jira
install
confluence
在 Kubernetes 中部署 nfs storageClass
·1026 字·3 分钟·
devops
k8s
storage-class
nfs
使用 Confluentinc 在 Kubernetes 集群中部署 Kafka 集群
·1133 字·3 分钟·
k8s
kafka
zookeeper
helm