- 博客/
使用 Helm 配合 localPV 在 K8s 中部署 Mariadb 主程复制集群
Table of Contents
环境说明#
- helm version:
v3.3.1 - kubernetes:
v1.17.9 - 使用 helm chart:
bitnami/mariadb - 操作系统:
CentOS 7.8.2003
helm 部署 mariadb 前的准备#
添加 helm 私服#
helm repo add bitnami https://charts.bitnami.com/bitnami

helm repo update  # 更新仓库索引

helm search repo mariadb
bitnami/mariadb         9.3.12          10.5.10         Fast, reliable, scalable, and easy to use open-...
对 chart 进行 定制更改优化#
下载对应 chart 文件
mkdir -p /data/helm/mariadb # create workspace


cd /data/helm/mariadb

helm fetch bitnami/mariadb

tar xf mariadb*.tgz  # 解压文件
编辑更改 secondary 对应 statefulset 模板文件
因为我们这里使用的是自己创建的
localPv进行数据的持久存储,而在默认的secondary对应的模板文件中,是没有指定使用现有pvc的逻辑,所有我们这里需要将这部分逻辑给添加一下。
vi mariadb/templates/secondary/statefulset.yaml

...
  {{- if not .Values.secondary.persistence.enabled }}
        - name: data
          emptyDir: {}
  {{- else if and .Values.secondary.persistence.enabled .Values.secondary.persistence.existingClaim }} # 添加 else if 语句
        - name: data
          persistentVolumeClaim:
            claimName: {{ tpl .Values.secondary.persistence.existingClaim . }}
  {{- else }}
..
创建 localPv#
这里我们手动创建 两个
pv&pvc,因为我们部署的是主程集群primary&secondary多需要进行对应数据的持久化,并本地将其绑定在了节点mn105&mn106上进行使用。
创建 StorageClass & pv 资源
对应 部署 yaml 文件如下所示,示例文件中分别创建了 localPv 的
StorageClass资源对象,并将对应卷绑定策略设置为了Immediate立即绑定。如果使用的是WaitForFirstConsumer模式的话,是指原本实时发生的 pvc 和 pv 的绑定过程,被延迟到对应 Pod 第一次调度的时候在调度器中进行,详情请查阅此 文档。
cat > local-pv.yaml << EOF
apiVersion: storage.k8s.io/v1
kind: StorageClass
metadata:
  name: local-storage
provisioner: kubernetes.io/no-provisioner
volumeBindingMode: Immediate  # Immediate or WaitForFirstConsumer
---
apiVersion: v1
kind: PersistentVolume
metadata:
  name: mariadb-primary-pv-local
  labels:
    role: primary
spec:
  capacity:
    storage: 100Gi
  volumeMode: Filesystem
  accessModes:
  - ReadWriteOnce
  persistentVolumeReclaimPolicy: Retain
  storageClassName: local-storage
  local:
    path: /data/k8s/localpv/mariadb-master
  nodeAffinity:
    required:
      nodeSelectorTerms:
      - matchExpressions:
        - key: kubernetes.io/hostname
          operator: In
          values:
          - mn105
---
apiVersion: v1
kind: PersistentVolume
metadata:
  name: mariadb-secondary-pv-local
  labels:
    role: secondary
spec:
  capacity:
    storage: 100Gi
  volumeMode: Filesystem
  accessModes:
  - ReadWriteOnce
  persistentVolumeReclaimPolicy: Retain
  storageClassName: local-storage
  local:
    path: /data/k8s/localpv/mariadb-slave
  nodeAffinity:
    required:
      nodeSelectorTerms:
      - matchExpressions:
        - key: kubernetes.io/hostname
          operator: In
          values:
          - mn106
EOF

kubectl apply -f ./local-pv.yaml  # 执行资源对象的创建
storageclass.storage.k8s.io/local-storage created
persistentvolume/mariadb-primary-pv-local created
persistentvolume/mariadb-secondary-pv-local created


kubectl get pv|grep Available
mariadb-primary-pv-local                   100Gi      RWO            Retain           Available                                                                                                local-storage            32s
mariadb-secondary-pv-local                 100Gi      RWO            Retain           Available                                                                                                local-storage            32s
创建 localPv 指定文件夹#
注意: localPv 创建时指定的文件夹,不会自己去创建。当pod调度时发现对应绑定的文件夹不存在时,会导致 pod 无法正常被调度。
mn105 节点
mkdir -p /data/k8s/localpv/mariadb-master
mn106节点
mkdir -p /data/k8s/localpv/mariadb-slave
创建 localPv pvc 资源对象#
kubectl create ns mariadb # 创建部署命名空间

cat > local-pvc.yaml << EOF
kind: PersistentVolumeClaim
apiVersion: v1
metadata:
  name: mariadb-primary-pvc-local
  namespace: mariadb
  labels:
    type: local
spec:
  accessModes:
  - ReadWriteOnce
  resources:
    requests:
      storage: 100Gi
  storageClassName: local-storage
  selector:
    matchLabels:
      role: primary

---
kind: PersistentVolumeClaim
apiVersion: v1
metadata:
  name: mariadb-secondary-pvc-local
  namespace: mariadb
  labels:
    type: local
spec:
  accessModes:
  - ReadWriteOnce
  resources:
    requests:
      storage: 100Gi
  storageClassName: local-storage
  selector:
    matchLabels:
      role: secondary
EOF

kubectl apply -f ./local-pvc.yaml   # 创建资源
persistentvolumeclaim/mariadb-primary-pvc-local created
persistentvolumeclaim/mariadb-secondary-pvc-local created

helm 部署对应资源#
创建 prod-values.yaml 部署文件#
可以使用如下命令进行查看默认的
values.yaml配置文件helm show values bitnami/mariadb > values.yaml
cat > prod-values.yaml << EOF
architecture: replication

auth:
  rootPassword: "123456"  # root 密码
  database: ancun # 初始化添加的 数据库
  username: "ancun"
  password: "123456"
  replicationUser: replicator
  replicationPassword: "123456"

primary:
  replicaCount: 1
  configuration: |-
    [mysqld]
    skip-name-resolve
    explicit_defaults_for_timestamp
    basedir=/opt/bitnami/mariadb
    plugin_dir=/opt/bitnami/mariadb/plugin
    port=3306
    socket=/opt/bitnami/mariadb/tmp/mysql.sock
    tmpdir=/opt/bitnami/mariadb/tmp
    max_allowed_packet=16M
    bind-address=0.0.0.0
    pid-file=/opt/bitnami/mariadb/tmp/mysqld.pid
    log-error=/opt/bitnami/mariadb/logs/mysqld.log
    character-set-server=UTF8
    collation-server=utf8_general_ci

    [client]
    port=3306
    socket=/opt/bitnami/mariadb/tmp/mysql.sock
    default-character-set=UTF8
    plugin_dir=/opt/bitnami/mariadb/plugin

    [manager]
    port=3306
    socket=/opt/bitnami/mariadb/tmp/mysql.sock
    pid-file=/opt/bitnami/mariadb/tmp/mysqld.pid
  resources:
    limits:
      memory: 8000Mi
      cpu: 2000m
    requests:
      memory: 4000Mi
      cpu: 1000m
  livenessProbe:
    enabled: true
    initialDelaySeconds: 120
    periodSeconds: 10
    timeoutSeconds: 1
    failureThreshold: 3
    successThreshold: 1
  readinessProbe:
    enabled: true
    initialDelaySeconds: 30
    periodSeconds: 10
    timeoutSeconds: 1
    failureThreshold: 3
    successThreshold: 1
  extraFlags: "--max-connect-errors=1000 --max_connections=155"
  extraEnvVars:
   - name: TZ
     value: "Asia/Shanghai"
  persistence:
    enabled: true
    existingClaim: mariadb-primary-pvc-local
    accessModes:
      - ReadWriteOnce
    size: 100Gi
  service:
    type: NodePort
    port: 3306


secondary:
  replicaCount: 1
  configuration: |-
    [mysqld]
    skip-name-resolve
    explicit_defaults_for_timestamp
    basedir=/opt/bitnami/mariadb
    port=3306
    socket=/opt/bitnami/mariadb/tmp/mysql.sock
    tmpdir=/opt/bitnami/mariadb/tmp
    max_allowed_packet=16M
    bind-address=0.0.0.0
    pid-file=/opt/bitnami/mariadb/tmp/mysqld.pid
    log-error=/opt/bitnami/mariadb/logs/mysqld.log
    character-set-server=UTF8
    collation-server=utf8_general_ci

    [client]
    port=3306
    socket=/opt/bitnami/mariadb/tmp/mysql.sock
    default-character-set=UTF8

    [manager]
    port=3306
    socket=/opt/bitnami/mariadb/tmp/mysql.sock
    pid-file=/opt/bitnami/mariadb/tmp/mysqld.pid
  resources:
    limits:
      memory: 8000Mi
      cpu: 2000m
    requests:
      memory: 4000Mi
      cpu: 1000m
  livenessProbe:
    enabled: true
    initialDelaySeconds: 120
    periodSeconds: 10
    timeoutSeconds: 1
    failureThreshold: 3
    successThreshold: 1
  readinessProbe:
    enabled: true
    initialDelaySeconds: 30
    periodSeconds: 10
    timeoutSeconds: 1
    failureThreshold: 3
    successThreshold: 1
  extraFlags: "--max-connect-errors=1000 --max_connections=155"
  extraEnvVars:
   - name: TZ
     value: "Asia/Shanghai"
  persistence:
    enabled: true
    existingClaim: mariadb-secondary-pvc-local
    accessModes:
      - ReadWriteOnce
    size: 100Gi
  service:
    type: NodePort
    port: 3306

metrics:
  enabled: false
  image:
    registry: docker.io
    repository: bitnami/mysqld-exporter
    tag: 0.12.1-debian-10-r444
    pullPolicy: IfNotPresent
  annotations:
    prometheus.io/scrape: "true"
    prometheus.io/port: "9104"
  resources:
    limits:
      memory: 256Mi
      cpu: 100m
    requests:
      memory: 256Mi
      cpu: 100m
  serviceMonitor:
    enabled: true
    interval: 30s
EOF
执行应用的部署#
ls
local-pvc.yaml  local-pv.yaml  mariadb  mariadb-9.3.12.tgz  prod-values.yaml

helm upgrade --install mariadb -f ./prod-values.yaml -n mariadb ./mariadb/

这里部署后,需要注意一下,在从库中默认是只读的,
root 除外。为了进行验证我们可以进入从库容器查看一下对应进程的args

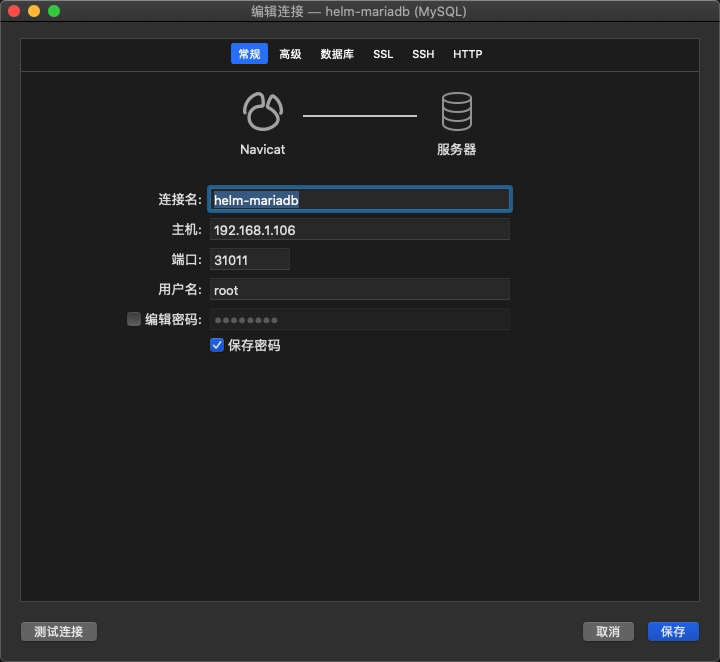
获取外部连接地址#
在 helm 部署文件中,我们把对应 service 资源类型设置为了
NodePort。外部连接的话,只需要获取到对应随机的端口号,组合集群中任意节点ip进行连接即可。
获取 NodePort 端口号
 kubectl get svc -n mariadb
NAME                TYPE       CLUSTER-IP      EXTERNAL-IP   PORT(S)          AGE
mariadb-primary     NodePort   10.101.91.176   <none>        3306:31011/TCP   3h12m
mariadb-secondary   NodePort   10.97.222.104   <none>        3306:31848/TCP   3h12m

安装后的测试#
测试主从复制#
这里测试使用的用户均已
root用户进行
在主中创建数据库,查看 slave 这边是否有对应同步

在主中对应数据库创建表,查看 slave 这边是否有对应同步
use testing;

create table test_tb (id int);
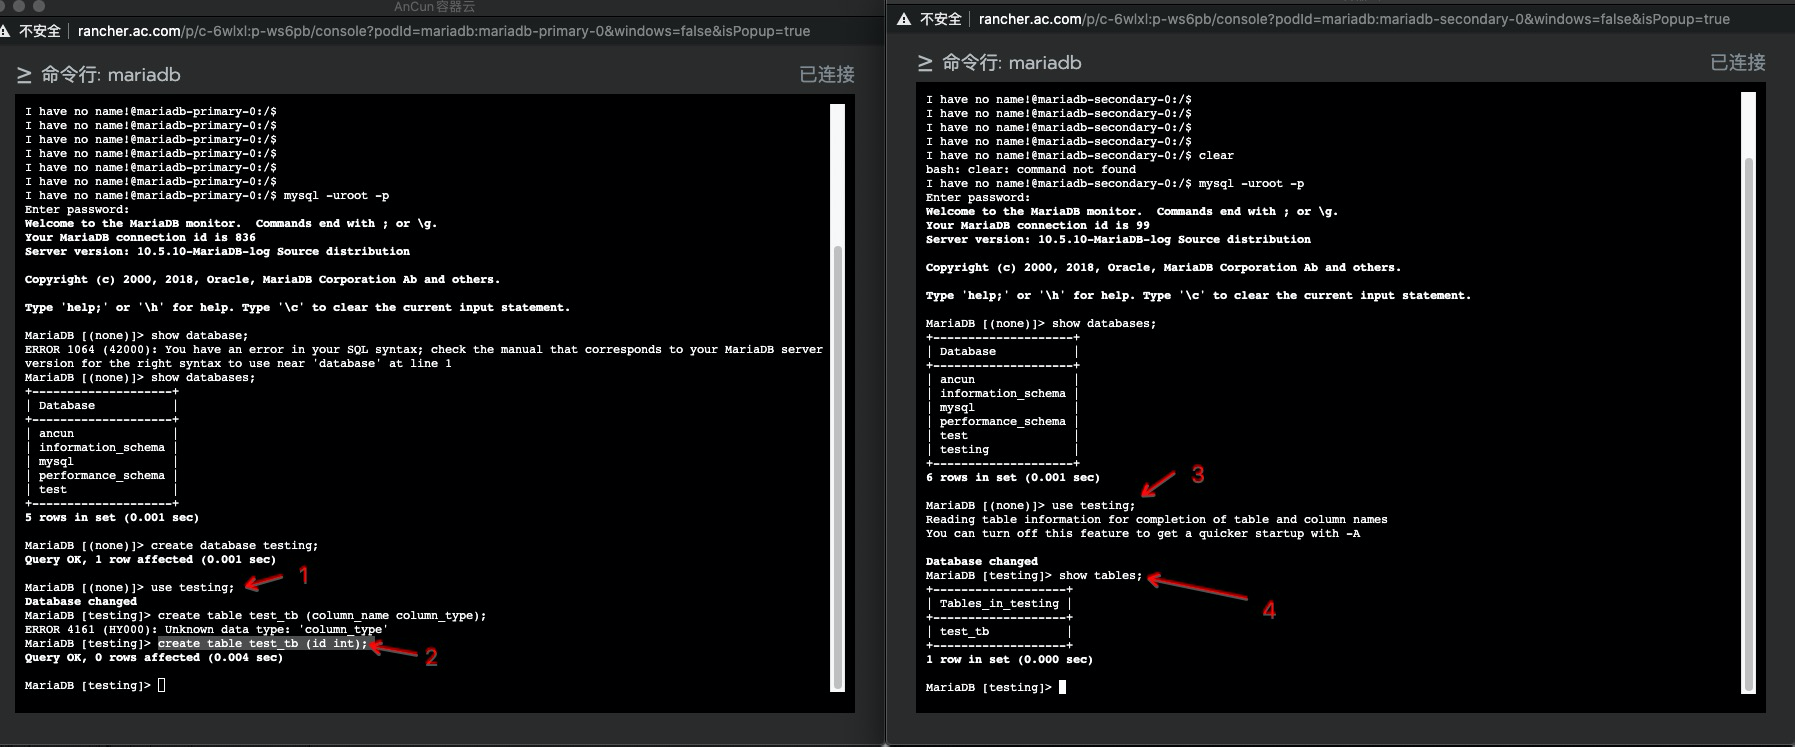
上面测试输出结果,可以看到正常进行了同步
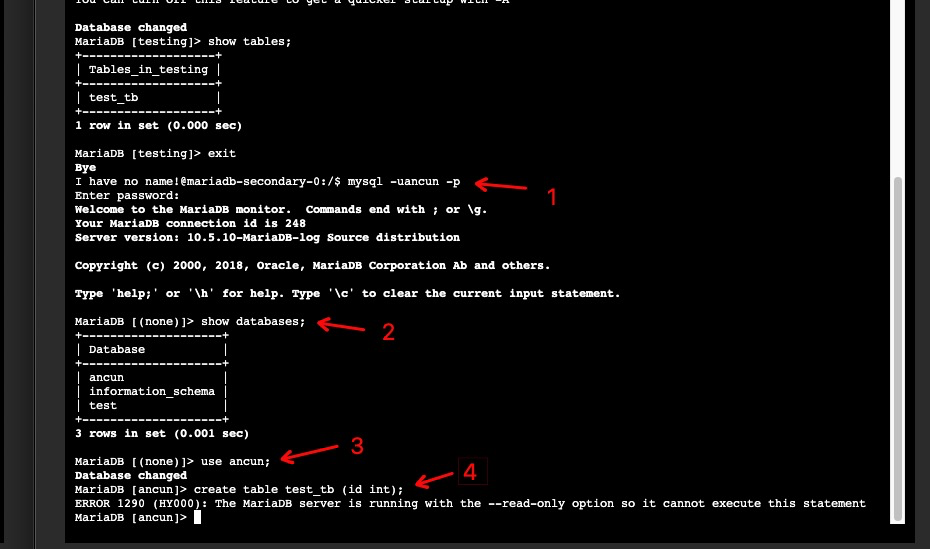
slave 端只读#
此次测试在
slave端进行,并使用 helm 文件中创建的用户ancun进行
 mysql -uancun -p

 show databases;

 use ancun;

create table test_tb (id int);
ERROR 1290 (HY000): The MariaDB server is running with the --read-only option so it cannot execute this statement
参考文档及链接#
https://github.com/bitnami/charts/tree/master/bitnami/mariadb/#installing-the-chart
https://github.com/bitnami/bitnami-docker-mariadb/issues/174
总结#
主从集群部署完毕后,这里还有两个问题需要提及和记录一下,
第一个: 由于使用的是 localPv 并做了节点亲和,pod 使用对应 localpv 的pvc进行数据卷挂载时,将会继承其亲和调度策略。如果这时对应primary(master)节点主机出现 down 机,主从集群将会被破坏且无法使用 kubernetes 调度策略实现 pod自恢复,在生产环境中有条件的话,这里建议是进行使用分布式存储,可满足 pod 调度在任意节点 那种。第二个: 由于 localPv 使用的是对应主机中的磁盘目录进行挂载,如果此时磁盘出现损坏,同样会导致集群被破坏,且数据可能丢失问题,建议做好定期的数据备份,并对 对应磁盘使用raid去提高磁盘稳定和可靠性。